Connect your lights
Tempolight drives many kinds of light at once, as one show. This page has a section for each kind: what to switch on in its own app, how to add it in Tempolight, and what to expect. Everything happens on the Devices page (under Setup in the menu), which is locked when you set a PIN.
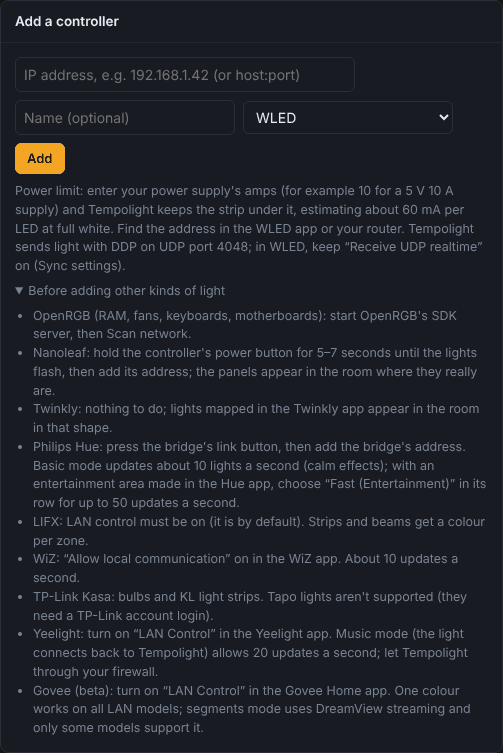
Two ways to add a light:
- Scan network (top of the Devices page): the lights found are listed under Found on the network; press Add next to each. Finds WLED, Govee, OpenRGB, LIFX, WiZ, Kasa, Yeelight and Twinkly.
- Add a controller: type the address (an IP address such as
192.168.1.42, orhost:port), optionally a name, pick the kind in the list, and press Add. Needed for Philips Hue, Nanoleaf and DMX, and for anything the scan doesn't find.
flowchart TD
  A["Switch on local control in the light's own app"] --> B{"Found by Scan network?"}
  B -- "yes" --> C["Devices → Scan network → Add"]
  B -- "no" --> D["Devices → Add a controller: address + kind → Add"]
  C --> E["It appears in the Devices table and in the room"]
  D --> E
  E --> F{"Status says Online?"}
  F -- "yes" --> G["Press Identify: it lights up white"]
  F -- "no" --> H["troubleshooting.md: Device offline"]
Every light you add is placed in the room by itself: a strip as a line, a bulb as a point, Nanoleaf and Twinkly in their real layout. Move them where they really are on the Room page (room-and-zones.md).
In the Devices table each light has: On (send the show to it or not), its name and address, LED count, the Protocol column (how Tempolight talks to it; for some kinds a mode choice), Power limit (A), Status (Online with Wi-Fi bars, or Offline), Delay (the live latency meter, see troubleshooting.md), and the buttons Identify (lights it up white), Check and Remove.
Which light, which mode
| Light | Found by scan | Updates a second | Best for | Status |
|---|---|---|---|---|
| WLED (DDP, the default) | yes | your frame rate (60 by default) | everything: every LED on its own | stable |
| WLED with E1.31 / Art-Net | as WLED | your frame rate | Falcon, FPP and other pixel controllers, or WLED set up that way | stable |
| Govee, one colour | yes | about 10 | calm effects, whole-light colour | beta |
| Govee, segments | yes | 25 | models with DreamView | beta |
| OpenRGB | yes | up to 40 | PC fans, RAM, keyboards | stable |
| Nanoleaf | no | 30 | panels, each panel its own colour | stable |
| Philips Hue, basic | no | about 10 for the whole bridge | calm effects, a few lamps | stable |
| Philips Hue, fast (Entertainment) | no | up to 50 | beat effects on Hue | beta, not yet tried on a real bridge |
| LIFX | yes | up to 20 per light | bulbs; strips and beams per zone | stable |
| WiZ | yes | about 10 | bulbs | stable |
| TP-Link Kasa | yes | about 10 | bulbs; KL strips | per-zone strips beta |
| Yeelight, music mode | yes | 20 | bulbs and strips | stable |
| Twinkly | yes | about 25 | strings, curtains, Squares, in their mapped shape | stable |
| DMX fixtures | no | about 40 | pars, moving heads, strobes, lasers, fog | not yet checked on a real node |
| Phones | (QR code) | your frame rate | guests at a party | stable |
The rule of thumb: for music, WLED (or any light that updates 25 times a second or more) is what makes the show feel tight. Lights that take about 10 updates a second follow the colours and the mood well, but a fast strobe or a chase looks smoother on WLED. You can mix them freely, and with zones give slow lights calm effects while the strips party.
The wire details of every protocol are in protocols.md.
WLED
WLED is free firmware for ESP8266 and ESP32 boards that drive LED strips. It's what Tempolight was made for.
Put WLED on a board
- Plug the ESP32 (recommended, especially above about 300 LEDs) or ESP8266 into a computer with a USB data cable.
- Open install.wled.me in Chrome or Edge, pick the newest version, press Install and choose the board's port. Or use Tempolight's own installer page, which installs WLED with Tempolight Lite (music-reactive even without a computer) on a classic ESP32.
- The installer may offer to set up Wi-Fi straight away. Otherwise join the Wi-Fi WLED-AP (password
wled1234) with your phone, openhttp://4.3.2.1, and enter your home Wi-Fi under WiFi Setup.
Set it up in WLED
Open the controller's page (http://<its address>) → Config:
- LED Preferences: the LED count, the LED type (WS2812B, SK6812, …), the data GPIO and the colour order. If red shows as green, change the colour order (GRB or RGB).
- Sync Interfaces: keep Receive UDP realtime on (it is by default). Tempolight streams with DDP on UDP port 4048.
- User Interface → Server description: a name such as "Desk". Tempolight uses it.
- In your router, give the controller a fixed address (a DHCP reservation). Tempolight follows a controller that moved by its name, but a fixed address is the most reliable.
Find its IP address
Any of these: the WLED app lists it; WLED's own page under Info; your router's list of devices; or simply Scan network in Tempolight, which finds WLED by its announcement (mDNS) and by asking every address on your network.
Add it
Devices → Scan network → Add, or type the address under Add a controller with the kind WLED. If the controller doesn't answer you see Couldn't reach a WLED controller at … Check the address, or add it anyway.; confirm to add it anyway (useful while it's switched off).
What to expect: Online, the firmware version (for example 0.15.0), the LED count WLED reports, and Frames
sent counting up. WLED shows the stream instead of its own effect while Tempolight sends, and goes back to its own
effect a few seconds after Tempolight stops.
Segments
The room's LED ranges (which LEDs are the left wall, which the desk, …) live in Tempolight. Send segments (in the device's row, or Send segments to WLED on the Room page) writes the same ranges into WLED as segments, handy when you also use WLED's own effects or presets.
Power limit
Enter your power supply's amps in Power limit (A) (for example 10 for a 5 V 10 A supply). Tempolight estimates
about 60 mA per LED at full white and caps brightness so the strip stays under it. Drawing now shows the estimate,
with capped while it holds brightness back. WLED's own limiter (LED Preferences) still applies too.
E1.31 (sACN) and Art-Net
DDP is the best choice for WLED. Use E1.31 or Art-Net for pixel controllers that don't speak DDP (Falcon, FPP, many commercial ones), or a WLED you've already set up for them.
- In the device's Protocol column choose E1.31 (sACN) or Art-Net.
- In Port / universe set the first universe. Defaults: E1.31 starts at 1, Art-Net at 0. Each universe carries 170 pixels, so a 500-LED strip uses three universes in a row.
- In WLED: Config → Sync Interfaces → Network DMX input: type E1.31 or Art-Net, the same start universe, DMX mode Multi RGB.
Several strips on one controller, or one strip on several
One WLED controller can drive one long strip split into several room shapes (left wall, back wall, …): set the LED ranges on the Room page. Several controllers are simply several devices; Tempolight keeps them in sync.
Govee
Beta: tested with Govee's documented LAN protocol, on a few models.
- In the Govee Home app: open the light → settings (gear icon) → turn on LAN Control. Only models with LAN Control can be used; the light and Tempolight must be on the same network.
- In Tempolight: Scan network → Add, or add it by IP with the kind Govee (LAN, beta).
- In the Protocol column choose:
- Govee: one colour: works on every LAN model. The light shows one colour, about 10 times a second, only when it changes.
- Govee: segments (beta): one colour per segment, 25 times a second, using the DreamView streaming mode. Enter the light's number of segments (1 to 60) in the next column. Only some models support it: if the light stays on one colour, go back to one colour.
OpenRGB (PC lighting)
OpenRGB controls RAM, fans, keyboards, mice, motherboards and graphics cards of most brands.
- Install and open OpenRGB on the PC, check it sees your devices, then open the SDK Server tab and press Start server (port 6742). Turn on starting the server with OpenRGB in its settings if you want it every time.
- In Tempolight: Scan network lists each OpenRGB device with its LED count; Add the ones you want. Or add by
address with the kind OpenRGB (PC lighting): the address fills in
127.0.0.1when OpenRGB runs on the same PC. - Each OpenRGB device is one Tempolight device (
OpenRGB #0,#1, …). If you see Couldn't reach OpenRGB …, the SDK server isn't running.
Nanoleaf
Shapes, Canvas, Elements and Lines. The scan doesn't find Nanoleaf, so you add it by address:
- Find the controller's IP address in your router's device list.
- Hold the power button on the Nanoleaf controller for 5 to 7 seconds, until the lights flash.
- Within 30 seconds: Devices → Add a controller, type the address, kind Nanoleaf panels, Add.
If you were too slow you see Hold the power button on the Nanoleaf controller for 5-7 seconds until the lights flash, then press Add again within 30 seconds. What to expect: the panels appear in the room in their real layout, each panel its own colour, 30 times a second.
Philips Hue
Hue lights go through the Hue bridge. Each colour light becomes one point in the room.
Basic mode
- Find the bridge's IP address: in the Hue app's settings (tap your bridge to see its details), or in your router's device list.
- Press the round link button on top of the bridge.
- Within 30 seconds: Devices → Add a controller, type the bridge's address, kind Philips Hue bridge, Add.
If you see Press the round link button on the Hue bridge, then press Add again within 30 seconds., press the button and Add again. What to expect: the bridge takes about 10 commands a second in total, shared by all its lights, so Tempolight sends the light that changed most first. Calm effects and colour changes look good; fast strobes don't.
Fast mode (Entertainment)
Beta: Tempolight has its own small streaming client for this, tested against a test server, not yet a real bridge. Tell us how it goes.
- In the Hue app: Settings → Entertainment areas → +, and put the lights you want in an area (up to 20).
- On the Devices page, the bridge's Protocol column now offers Hue: fast (Entertainment). Choose it.
- If the bridge was added before fast mode existed, Tempolight asks you to press the link button again first.
What to expect: up to 50 updates a second for the lights in the area; lights outside it stay as they are. If streaming can't start, Tempolight falls back to basic mode and tries again every 30 seconds.
LIFX
- LAN control is on by default (check the LIFX app's settings if the scan doesn't find the light).
- Scan network → Add, or add by IP with the kind LIFX.
What to expect: bulbs show one colour; strips and beams show one colour per zone (LIFX, 16 zones); tiles and candles get one colour. Up to 20 updates a second per light.
WiZ
- In the WiZ app, turn on Allow local communication (in the app's settings, under privacy or security).
- Scan network → Add, or add by IP with the kind WiZ.
About 10 updates a second, only when the colour changes. WiZ has a minimum brightness: below it the light switches off.
TP-Link Kasa
Kasa colour bulbs (KL and LB models) and the KL400, KL420 and KL430 light strips.
- Set the light up in the Kasa app as usual.
- Scan network → Add, or add by IP with the kind TP-Link Kasa.
- Strips: the Protocol column offers Kasa: whole strip or Kasa: N zones (beta) (per-zone colours, not yet confirmed on hardware).
Not supported: Tapo lights, and Kasa devices with the newer firmware that needs a TP-Link account login. About 10 updates a second.
Yeelight
- In the Yeelight app: open the light → settings → turn on LAN Control.
- Scan network → Add, or add by IP with the kind Yeelight.
- The Protocol column: Yeelight: music mode (20/s) (the default) or Yeelight: normal (1/s).
In music mode the light connects back to Tempolight, so your computer's firewall must let it in: when Windows or macOS asks about incoming connections, allow them (private networks), and on Linux open incoming TCP for Tempolight. If the light can't connect, Tempolight shows one colour a second and tries music mode again every 15 seconds. Music mode doesn't work from Docker Desktop (docker.md).
Twinkly
Nothing to switch on. Scan network → Add, or add by IP with the kind Twinkly. If you mapped the lights in the Twinkly app (with its camera), they appear in the room in that shape; otherwise as a line. About 25 frames a second.
DMX fixtures
Pars, dimmers, strobes, moving heads, lasers and fog machines, through an Art-Net or sACN node (a box that turns network into DMX). The packets and channel values are tested; it hasn't been tried with a real node and real fixtures yet, and moving-head and colour-wheel values differ per fixture (use a custom profile when they do).
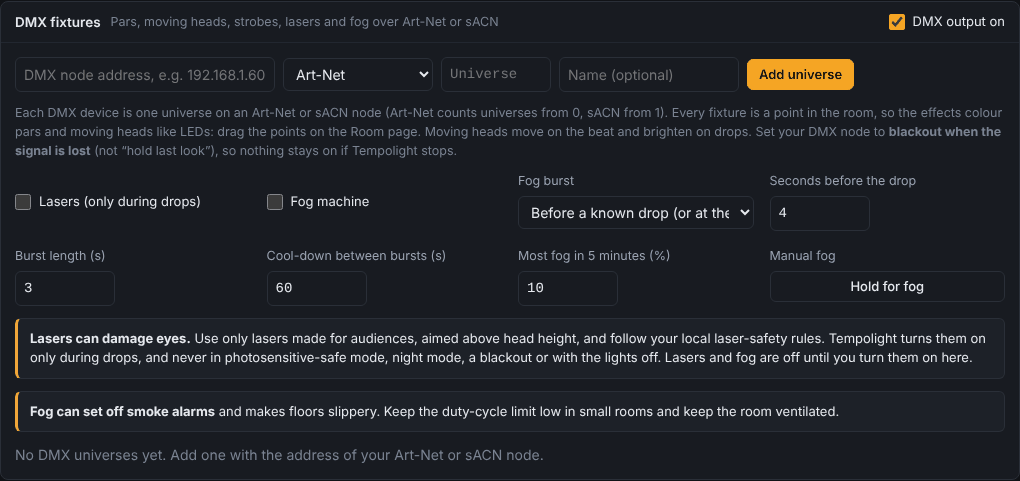
- Connect the node to your network and the fixtures to the node with DMX cables, and give each fixture a DMX address (on the fixture's display) so their channels don't overlap.
- Set the node to blackout when the signal is lost (not "hold last look"), so nothing stays on if Tempolight stops.
- On the Devices page, in DMX fixtures: enter the node's address, pick Art-Net or sACN (E1.31), the universe (Art-Net counts from 0, sACN from 1) and a name, then Add universe.
- Under the universe, for each fixture: pick its profile, enter its DMX address (the next free one is filled in),
optionally a name, Add fixture. Profiles: RGB par, RGBW par, RGBA par, Dimmer, Strobe (intensity,
rate), Moving head (8- or 16-bit, RGB or colour wheel), Laser (on/off, pattern), Fog machine, and Custom
(your channel list), for example
dimmer, red, green, blue, fixed:0. - Moving heads have a Movement: Circle, Figure 8, Sweep, Point at a place, or Still. They move on the beat and brighten on drops.
- Channels now shows every channel's value live, so you can check a fixture before the party.
Each fixture is a point in the room: drag them where they hang on the Room page.
Lasers and fog are off until you turn them on, with Lasers (only during drops) and Fog machine.
- Lasers can damage eyes. Use only lasers made for audiences, aimed above head height, and follow your local laser-safety rules. Tempolight runs them only during drops (for at most a minute), and never in photosensitive-safe mode, night mode, a blackout or with the lights off.
- Fog gives a burst before a drop the song analysis knows about (or at the drop when listening live), with a cool-down between bursts and a limit on how much fog in 5 minutes. Fog can set off smoke alarms and makes floors slippery: keep the limit low in small rooms and ventilate. Hold for fog (and the Fog pad on Live pads, key G) fogs by hand for up to 10 seconds.
- Strobes flash only on the strobe pad and the first two seconds of a drop, never in photosensitive-safe or night mode.
Phones as lights
Every phone in the room can be a light. Live pads → Phones as lights shows a QR code; guests on the same Wi-Fi scan it, tap Start, and their screen becomes part of the room. Details in party-and-dj.md.
Virtual devices
Add virtual device adds a pretend controller that's only drawn on screen. Use it to try layouts and effects before the lights arrive, or for a Stream Deck or OBS setup without lights.
Advanced
- Frame rate. Settings → Lighting → Frame rate (20 to 90, 60 by default). Lower it to 30–40 on busy Wi-Fi or a Pi Zero; Performance → Low power does that and more on small computers.
- Non-default ports. WLED's DDP port is in the Port / universe column; a DMX node or OpenRGB on another port
takes
host:portas the address. - WLED audio sync. Settings → Integrations → Send WLED audio sync: WLED's own sound-reactive effects (and Tempolight Lite) then react to what Tempolight hears, for controllers you leave on their own effects.
- API.
POST /api/devicesadds any of these; see api.md.